One big cooking production that I don't mind as much is making fries from scratch. A few weeks ago, we needed to use up the big bag of potatoes we bought and that were beginning to sprout, so I peeled them all (skinning a knuckle and fingernail in the process), Dear cut them into strips, and we fried everything in a cast iron pot.
We fried the fries a second time to give them crispness (first fry was to cook the potatoes through). Then we sprinkled garlic salt over them -- so good! My mouth waters to think about it now.
Showing posts with label DIY. Show all posts
Monday, April 02, 2007
Tuesday, March 20, 2007
Saving coupon$
It has been a glorious day of relaxation, minor organization, and just general vegging out. I could really get used to this life of houswifery and I can totally see why people become hermits (with the heat at a comfortable temp., sun streaming in through the windows -- why would you ever want to leave the apartment?).
But not everything has been sloth and play. I've been looking for a way to use up the hundreds of paint chips that I've gathered and I thought I'd make a coupon organizer. Yes, I love to clip coupons but I love even more to use the coupons! But I've never had a good system for organizing the coupons and I end up frantically searching for the one that I need while waiting on line at the market. So I created something, which still has some kinks in it, but should do for now:
I want to say that I had a lot of forethought and designated appropriate colors for each section, such as cool blues for "frozen foods" but I really didn't.
Gulp, tomorrow is my first day at the new job!
Monday, March 19, 2007
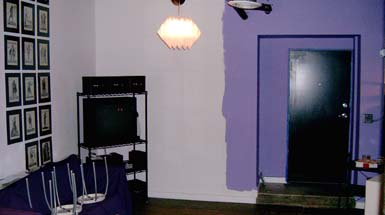
Today I finally finished the second coat of paint in the alcove. Just when I thought I was done painting that area and we could move some furniture over, I realize that the moulding also needs to be painted. GRRRRR!! Who, in their right minds, would ever paint trim to be any other color other than white or off-white?! If the previous tenant had left it white-ish like she did with the living room, I'd be done by now!!
And for moulding, you have to really clean up/sand all the little nooks, otherwise the paint pools up in all those little details (as it already has) and it loses its profile. So not looking forward to this part. :(
[SIDENOTE: If you are interested, that unique-looking ladder was made by Dear's grandfather -- isn't that cool? It's a bit heavy, but I am proud to be able to use something he has made with his own hands, without the help of power tools. I've heard he was really good with his hands and I would have liked to meet him.]
And for moulding, you have to really clean up/sand all the little nooks, otherwise the paint pools up in all those little details (as it already has) and it loses its profile. So not looking forward to this part. :([SIDENOTE: If you are interested, that unique-looking ladder was made by Dear's grandfather -- isn't that cool? It's a bit heavy, but I am proud to be able to use something he has made with his own hands, without the help of power tools. I've heard he was really good with his hands and I would have liked to meet him.]
Saturday, March 17, 2007
Progress on alcove, or how to remove wallpaper
I took Wednesday off and actually got some work on the apartment done. I am so unmotivated now, it is a struggle which I can't stand more, the mess of things unfinished or the labor involved to finish. Right now, I'm "working" on the little alcove area next to the living room. I dread even thinking about painting the hallway and doors (more funky colors to cover up!).
On Wednesday, I had some help with the sanding (which I detest more than the painting) and then I painted the first coat. Now I have just one coat left (after another light sanding of course, grrr)! Here is the progression:
BEFORE: flowery, paisley-like wallpaper and yes, the baseboard moulding really was painted yellow and green.
A few moons ago, I tested a small area to see whether fabric softener really would loosen the paper and it did! Then I stopped working in this area to finish the bedroom, which we would need so that we could sleep comfortably.
Here's another view of this area, where you can see the confluence of colors that the previous tenant lived with. I am too embarassed to show the other side right now, where there are even more colors.
So the first order of business, after struggling to remove the somewhat plasticky paper was to score it. I got this round thingy with rolling wheels underneath that pierced the paper with lots of little holes without damaging the wall behind the paper. Then I sprayed a whole lot of fabric softener, letting it soak in.
And the sheets became easy to pull down. I think the tiny holes really helped.
Sometimes a few bits and pieces were left behind because I didn't let that area fully soak. I just re-sprayed, waited a few minutes, and then scraped with a scraper.
Dear helped by removing the picture hooks with a pair of pliers.
After all the wallpaper was removed, I washed all the walls with TSP, a blue liquid that really cleans your walls and leaves it feeling slightly rough, ready to primed. I thought it necessary to use TSP to make sure all the glue from the paper was completely gone. After washing with TSP, it is necessary to rinse it off thoroughly.
I took the extra step of priming with an oil-based primer so that if there were any glue residue (wallpaper glue is water-based) the oil would block it (since oil and water don't mix).
On a sidenote, I think it will be OK to keep the light fixture here (just need to straighten it out a little). At first, with the busy twirls of the wallpaper matching the curves on the fixture, I thought it was just too much going on in such a small space. Now, I think the curves are a good complement to the plain walls.
Today, I proceeded to lightly sand the walls and then apply the second coat. Unfortunately, I ran out of paint so I only finished a wall. When will this ever be done? I can't wait to roll up the dropcloth in this area because we keep tripping on it and it is so ugly!
On Wednesday, I had some help with the sanding (which I detest more than the painting) and then I painted the first coat. Now I have just one coat left (after another light sanding of course, grrr)! Here is the progression:
BEFORE: flowery, paisley-like wallpaper and yes, the baseboard moulding really was painted yellow and green.A few moons ago, I tested a small area to see whether fabric softener really would loosen the paper and it did! Then I stopped working in this area to finish the bedroom, which we would need so that we could sleep comfortably.
Here's another view of this area, where you can see the confluence of colors that the previous tenant lived with. I am too embarassed to show the other side right now, where there are even more colors.
So the first order of business, after struggling to remove the somewhat plasticky paper was to score it. I got this round thingy with rolling wheels underneath that pierced the paper with lots of little holes without damaging the wall behind the paper. Then I sprayed a whole lot of fabric softener, letting it soak in.
And the sheets became easy to pull down. I think the tiny holes really helped.
Sometimes a few bits and pieces were left behind because I didn't let that area fully soak. I just re-sprayed, waited a few minutes, and then scraped with a scraper.
Dear helped by removing the picture hooks with a pair of pliers.After all the wallpaper was removed, I washed all the walls with TSP, a blue liquid that really cleans your walls and leaves it feeling slightly rough, ready to primed. I thought it necessary to use TSP to make sure all the glue from the paper was completely gone. After washing with TSP, it is necessary to rinse it off thoroughly.
I took the extra step of priming with an oil-based primer so that if there were any glue residue (wallpaper glue is water-based) the oil would block it (since oil and water don't mix).
On a sidenote, I think it will be OK to keep the light fixture here (just need to straighten it out a little). At first, with the busy twirls of the wallpaper matching the curves on the fixture, I thought it was just too much going on in such a small space. Now, I think the curves are a good complement to the plain walls.
Today, I proceeded to lightly sand the walls and then apply the second coat. Unfortunately, I ran out of paint so I only finished a wall. When will this ever be done? I can't wait to roll up the dropcloth in this area because we keep tripping on it and it is so ugly!
Monday, January 29, 2007
New Year's Resolutions
I am off to a slow start this year. Today, on Monday, January 29 (a full 29 days into the new year), I resolve to read the Bible chronologially in one year. I got the idea from Back to the Bible and I like the idea of reading the Good Book in the order that things happened b/c I would always get confused about the order of events (and I like order! despite the entropic way of things in my life). The online guide is meant to be used by visiting the site daily but I decided to create a little paper version so that I can read on the train. Oh, did I mention that I endeavor to read the King James version?
Another slow start is my knitting. Never mind the half-finished mitten I began last year, I finally cracked open Dear's little Christmas gift to me: the 2007 Knitting Calendar, with a pattern a day. I probably won't do most of the patterns but at least it will be a handy desk calendar. And perhaps it will help with Hope for New York's knitting project to knit hats and scarves for the needy.
Will I have time to do all this, plus fix up the apartment (my goal is to be in time for Chinese New Year)? Ha!
Thursday, December 21, 2006
A modern room and wallpaper removal
I came across the Kreiss site today and just loved the look of this room: cool, clean, comfortable. It's called the Libra collection and surprisingly has materials that I wouldn't normally consider, like marble (always thought that too high-end shi-shi for my taste) and wrought iron. But I like how bright and light the room is, with several accent colors and the contrast with dark materials. I've always liked the look of a white room with dark floors -- it just looks so spacious and airy (I guess tall ceilings also help in this instance).
And I really like this chair:

for the low price of $2575. It looks so comfy, yet has clean lines and looks solid. Hoping to find a close replication for much less.
Meanwhile, I'm looking into wallpaper removal options for the apartment:
And I really like this chair:
for the low price of $2575. It looks so comfy, yet has clean lines and looks solid. Hoping to find a close replication for much less.
Meanwhile, I'm looking into wallpaper removal options for the apartment:
- a step-by-step primer, from This Old House
- video and instructions on what to do when someone has painted over the wallpaper, from an episode on Ask This Old House that I saw on PBS
- step-by-step, from Zinnser (using their products, of course)
- information on stripping and how to paint afterwards, from This Old House
- and lastly, I've heard about spraying the paper with fabric softener mixed with hot water
Monday, November 20, 2006
Paint inspiration
I was surfing today and somehow came across this on the design*sponge site:
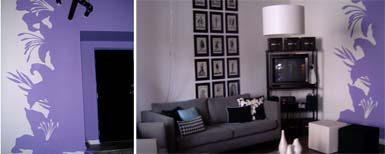
I think it is a great way to transition colors from space to space and it seems pretty DIY-able. Not sure when/where to use this, or if I could even find a design that I like, but I will tuck it away for the future.
Also, I've always liked the idea of having a chalkboard wall. Here's a way to make custom colors of it. All you need to do is mix up the following:
3 teaspoons acrylic paint
1 1/2 teaspoons glazing medium (water-based)
1/2 teaspoon powder tile grout
Or from everyone's favorite Martha:
Custom Colors: How To

I think it is a great way to transition colors from space to space and it seems pretty DIY-able. Not sure when/where to use this, or if I could even find a design that I like, but I will tuck it away for the future.Also, I've always liked the idea of having a chalkboard wall. Here's a way to make custom colors of it. All you need to do is mix up the following:
3 teaspoons acrylic paint
1 1/2 teaspoons glazing medium (water-based)
1/2 teaspoon powder tile grout
Or from everyone's favorite Martha:
Custom Colors: How To
Start with flat-finish latex paint in any shade. For small areas, such as a door panel, mix 1 cup at a time.
- Pour 1 cup of paint into a container. Add 2 tablespoons of unsanded tile grout. Mix with a paint stirrer, carefully breaking up clumps.
- Apply paint with a roller or a sponge paintbrush to a primed or painted surface. Work in small sections, going over the same spot several times to ensure full, even coverage. Let dry.
- Smooth area with 150-grit sandpaper, and wipe off dust.
- To condition: Rub the side of a piece of chalk over entire surface. Wipe away residue with a barely damp sponge.
Monday, November 06, 2006
Learning weekend
This weekend, MIL and I sorta bonded over the sewing machine. I guess all her nitpickiness and exacting standards (to the way she wants things, not necessarily always the best way) pay off when she's teaching or trying to impart wisdom (often she'll just come across, somewhat annoyingly, as a 'know-it-all'). I don't have a sewing machine (yet!) and I've just started learning how to use one, so I really appreciated her help with hemming my jeans. I can sew by hand without many problems but the machine is a different story. Even by hand I've found hemming pants tricky (especially when you try to do the hidden seams -- no idea what that's really called) so hemming pants by machine = very daunting task (and yet not worth the $10/pair of pants at the tailor, imo). But this weekend I saw that it's not so bad, even kinda fun. I'm not sure if I can remember all the steps but I can't wait to try hemming on another pair (maybe pj pants, since there's less at stake there)!
Despite all the bonding (and there wasn't a whole lot) I still don't know what to call her.
Subscribe to:
Posts (Atom)